
Here’s a little secret from the world of coin collecting: the best way to clean old coins is, in most cases, to not clean them at all. For any coin that might be valuable, antique, or rare, any attempt at cleaning can dramatically reduce its worth. Collectors prize the original surface and the story it tells, not a shiny, new-looking piece.
The Collector's Dilemma: To Clean or Not to Clean?

Before you even think about reaching for the polish, it’s vital to understand a core principle of numismatics: ‘cleaning’ is often just another word for ‘damaging’. When you hear experts and seasoned collectors talk, you’ll notice they value originality above everything else. A coin that has been polished, scrubbed, or treated with chemicals is seen as permanently altered, and its value plummets.
What you might see as just tarnish or dirt, a collector sees as history itself. This layer has a name: patina.
Why Patina is So Valuable
Patina is the thin layer of surface oxidation that builds up on a coin over many decades, or even centuries. It's the result of the coin's natural ageing process, creating unique colours and textures that act as a historical fingerprint. This is completely different from loose dirt or grime you might find on a recently unearthed coin.
A coin's patina is a testament to its journey through time. Removing it is like tearing out chapters from its story—and in the world of collecting, that story is often where the real value lies.
A rich, stable patina can even protect the metal underneath from further corrosion. When you aggressively remove it, you expose the raw metal, often leaving it looking unnaturally bright. Worse, you create microscopic scratches that are immediately obvious to a trained eye. For a serious UK collector, a coin with a beautiful, original patina is always more desirable than a shiny, cleaned one.
So, When is Cleaning Ever Okay?
Does this mean you should never touch a coin? Not quite. The crucial difference is between harmful, abrasive cleaning and gentle, conservation-focused methods. The goal of conservation isn't to make a coin look brand new, but to stabilise it and stop any further decay.
You might consider intervention in a few specific scenarios:
- Loose Debris: A coin caked in loose soil or sand after being dug up might need a gentle rinse just to be identified. The aim here is simply to remove the dirt that’s hiding the details, not to alter the surface itself.
- Harmful Residues: If a coin has something actively corrosive on it, like the dreaded "green slime" from PVC residue (a common issue from improper storage), careful removal might be necessary to prevent long-term damage.
- No Numismatic Value: A common, modern coin from your pocket change has no special collector value tied to its surface. Cleaning it won't destroy its worth, which is simply its face value. Go ahead and make it shiny if you wish!
Before you do anything, you must identify the coin's metal. Copper, silver, and bronze all react very differently to cleaning agents, and using the wrong one can lead to irreversible discolouration or pitting.
When in doubt, always remember the golden rule: leave the coin as you found it.
A Gentle Approach to Removing Surface Grime
When a coin is so caked in muck that you can't even tell what it is, a bit of careful cleaning is necessary. The same goes for any coin with potentially harmful gunk on it. But forget everything you’ve seen about using abrasive scrubs or household chemicals—that’s a fast track to ruining a piece of history.
The goal here is conservation, not making it shiny and new. We always start with the gentlest method possible.
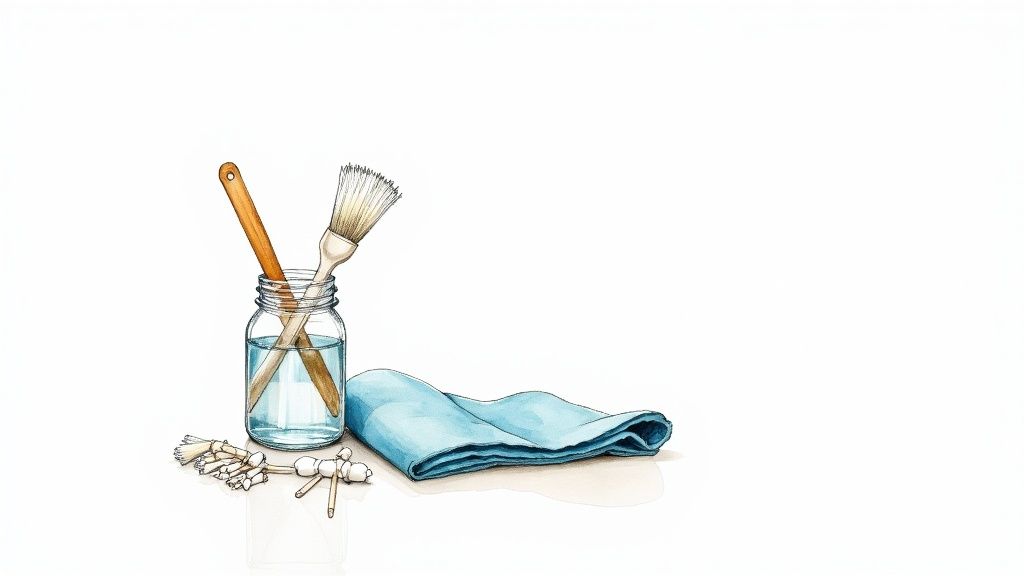
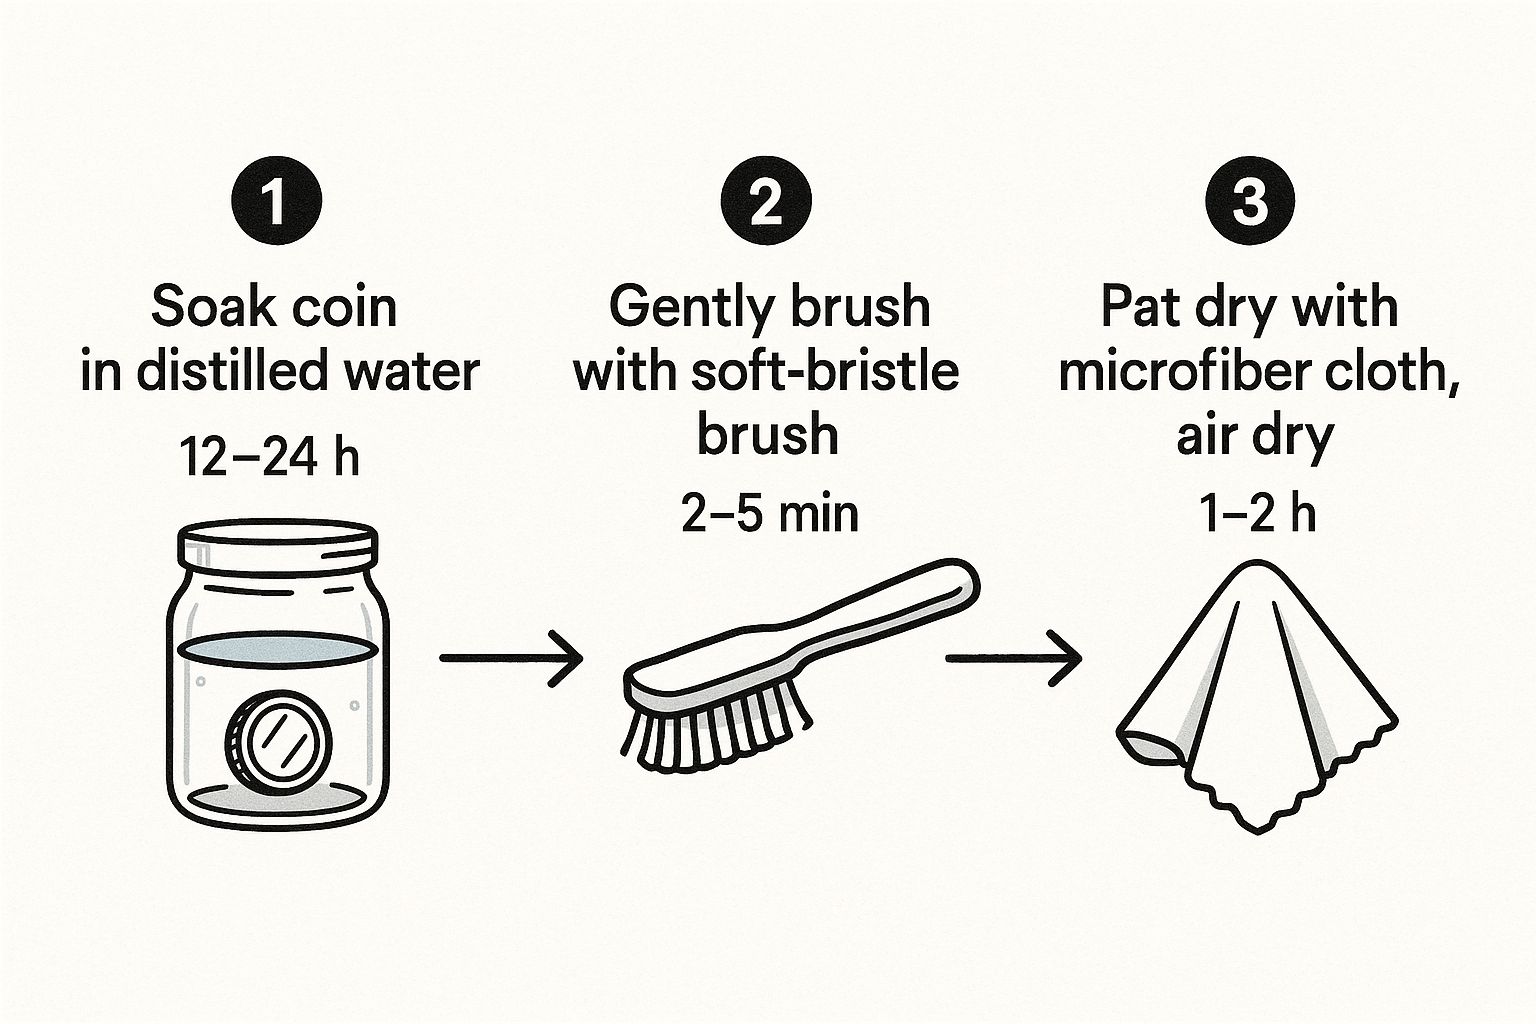
Our first, and often only, port of call is the numismatist's best friend: distilled water. Why not tap water? Because it’s full of minerals and chlorine that can react with the metal, leaving spots or causing damage over time. Distilled water is pure H₂O, so it won’t leave any unwanted residues behind.
Find a small, non-metallic container—a plastic or glass dish is perfect. A metal bowl is a bad idea as it could easily scratch the coin. Submerge your coin completely in room-temperature distilled water and just let it be. This is where patience really pays off.
The Initial Soak and Evaluation
So, how long do you leave it? It really depends on how stubborn the dirt is. A coin with just a bit of loose soil might only need a few hours. For a piece you’ve just dug up from the garden, you could be looking at a soak lasting 24 to 48 hours, maybe even longer.
Check on it from time to time. You can gently lift it from the water—always holding it by its edges—to see if the grime is starting to soften. If you see little particles floating in the water, that’s a great sign that it's working.
Once the initial soak is done, give the coin a rinse under a gentle stream of fresh distilled water. If some dirt is still clinging on, you can very carefully try to dislodge it. The best tool is a purpose-made, soft-bristled numismatic brush. In a pinch, a brand-new, incredibly soft baby's toothbrush will do. Whatever you do, don't apply pressure; just let the bristles do the work.
Using a pH-Neutral Soap for Tougher Grime
If water alone hasn’t done the trick, the next step up is a mild, pH-neutral soap. A tiny drop of a simple washing-up liquid—the kind without degreasers, bleach, or moisturisers—is what you need. Add it to some fresh distilled water, create a few light suds with your fingers, and soak the coin again. This can help break down any oily or more resilient grime that the water couldn't shift.
The consensus in the UK numismatic community is that a gentle approach is paramount. Experts often recommend a distilled water bath for around 15-30 minutes, which is remarkably effective for removing loose surface dirt without harming the coin.
After a soap soak, a thorough rinse with fresh distilled water is absolutely essential to get rid of any soap residue. To dry it, gently pat the coin with a soft, lint-free microfibre cloth. Never, ever rub it. The safest way to finish is to let it air-dry completely on the cloth for a few hours.
This minimal-intervention method is the professional standard. It's how you lift away the dirt while keeping the valuable history etched into the coin's surface intact. For coins with more serious problems like rust, our guide on how to clean dirty and rusty coins offers more specific advice.
Comparing Safe Cleaning Methods
To help you decide which approach is right for your coin, here’s a quick comparison of the gentle methods we’ve discussed. This should give you a clear idea of what to use and when.
| Method | Best For | Equipment Needed | Risk Level |
|---|---|---|---|
| Distilled Water Soak | Loose soil, light surface dirt, unidentified grime | Distilled water, non-metallic dish | Very Low |
| Gentle Brushing | Softened, stubborn dirt after an initial soak | Soft-bristled numismatic brush, distilled water | Low |
| pH-Neutral Soap | Oily residue, tougher grime that water can't lift | Distilled water, pH-neutral soap, non-metallic dish | Low to Medium |
Choosing the right method comes down to assessing the coin first. Always start with the least invasive option—the distilled water soak—and only move on to other methods if absolutely necessary. Patience is key to preserving your coin's integrity and value.
Handling Tough Encrustations on Ancient Finds
Sometimes, a simple soak in distilled water just won’t cut it. This is a common reality for metal detectorists and history buffs who unearth Roman or Medieval coins after centuries underground. These finds are often locked in a thick, stubborn casing of hardened mud and corrosion that gentle methods simply can’t shift.
When you’re faced with this, the goal isn't to aggressively strip the coin back to bare metal. That would be a disaster. Instead, we need to turn to careful, advanced mechanical cleaning. It's a delicate process that demands patience and the right tools to physically remove the heavy build-up without scratching or harming the coin's surface and the precious patina underneath.
The Right Tools for Delicate Work
Before you even think about starting, you need to assemble the correct toolkit. Rushing in with a metal pin or a hard-bristled brush is a surefire way to cause irreparable damage. The trick is to use tools that are actually softer than the coin’s metal itself.
Here’s what you’ll find in an experienced UK detectorist’s kit:
- Wooden Skewers: Simple BBQ skewers, sharpened to a fine point, are fantastic. They’re perfect for gently probing and chipping away at softened, crusty dirt. Being wood, they are far less likely to scratch bronze or silver.
- Composite Cleaning Pencils: These are specialised tools that look like pencils but have a core made from a composite of fibreglass and other materials. They're designed to crumble away heavy deposits without gouging the coin's surface.
- A Soft-Bristled Brush: Essential for sweeping away loosened debris. A numismatic-grade brush is your best bet.
- Magnification: This is non-negotiable. A magnifying lamp or a jeweller's loupe is absolutely essential. You have to see exactly what you are doing to tell the difference between the encrustation and the coin's delicate details.
This visual guide shows a basic, safe workflow for the initial stages of cleaning any old coin, which really forms the foundation of this more advanced process.
The image drives home the point: patience, prolonged soaks, and gentle handling are at the very core of any successful coin conservation effort.
A Multi-Stage Cleaning Process
The most effective approach combines patient soaking with careful mechanical work. This isn't a five-minute job; it can take days, or even weeks. Kick things off by soaking the coin in distilled water for at least 24 hours to soften the outer layer of grime.
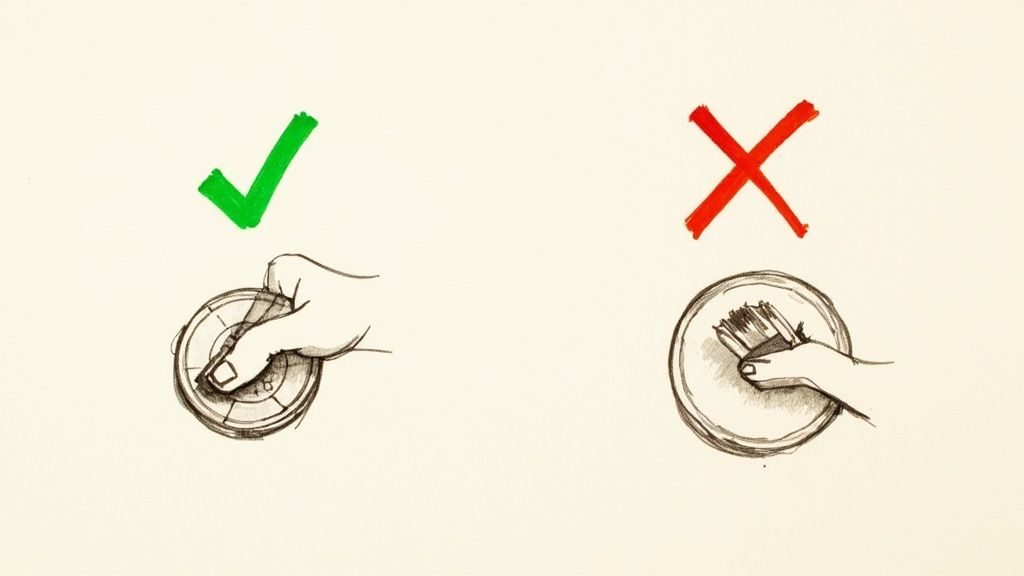
After the soak, place the coin on a soft pad under your magnifier. Take a wooden skewer and gently test the encrustation. If it feels soft, you can begin to carefully flake it away. Work slowly, moving from the edge of the coin towards the centre. Remember, the key is to chip away the dirt, not scrape the coin.
Never apply force. If a piece of dirt won't budge, it's not ready. Put the coin back in its distilled water bath for another day or two and try again. This patience is what separates conservation from destruction.
We can learn a lot from the experiences of the UK detecting community. Documented case studies on ancient Roman and Medieval coins show just how effective this multi-stage approach is. One detailed account from 2020 described a process where an initial 30-minute session using skewers and composite pencils removed about two-thirds of the hard encrustation. The coin was then re-soaked for 24 hours, which softened the rest of the dirt enough to achieve 90-95% removal without damaging the patina underneath.
This method really shows that successfully cleaning old coins is often about combining techniques. By alternating between soaking and careful manual work, you let the water do the heavy lifting, preserving the history you’ve worked so hard to uncover. For a broader look at the topic, you might be interested in our complete restoration guide for old coins.
Common Mistakes That Will Devalue Your Collection
Knowing how to clean a coin is only half the battle. Knowing what not to do is arguably even more important. A single misstep with the wrong substance or tool can instantly turn a piece of history into worthless, damaged metal. The road to devaluing a collection is often paved with good intentions and household cleaning products.
So many new collectors make the same mistake. They reach for things they already have under the kitchen sink, thinking what works on a dirty saucepan must work on a coin. This is a catastrophic error. Items like vinegar, lemon juice, and even baking soda are common culprits that cause irreversible harm.
Using acidic substances like vinegar or lemon juice doesn't 'clean' a coin; it corrodes it. These acids aggressively eat away at the coin’s surface, stripping away the protective patina and leaving the metal with an unnatural, pitted, and discoloured finish.
Likewise, baking soda isn't a gentle cleaner. It's an abrasive. When you mix it into a paste and rub it on a coin, it acts like fine-grit sandpaper. This creates thousands of microscopic scratches across the coin’s surface. To a numismatist, these tell-tale signs of cleaning are impossible to miss and instantly destroy the coin’s grade and value.
Abrasive Tools and Polishes to Avoid
The damage isn't just chemical. The tools you choose are just as critical. Many beginners grab a toothbrush or—in the worst cases—wire wool to scrub away stubborn dirt.
This kind of physical abrasion is devastating. It gouges the metal, wears down the fine details of the design, and leaves behind a pattern of harsh, parallel scratches. A coin that has been scrubbed like this is considered 'ruined' in the eyes of the collecting community.
Here are some common items that should never touch a valuable coin:
- Toothbrushes: The bristles are far too stiff and will absolutely scratch the coin’s surface.
- Metal Polishes: Products like Brasso are designed for a brilliant shine, which they achieve by removing the top layer of metal—patina and all.
- Wire Wool or Scouring Pads: These will completely destroy a coin's surface in seconds. There's no coming back from this.
- Ultrasonic Cleaners: While they work for jewellery, the intense vibrations can easily damage the delicate surfaces of old coins.
Imagine finding a beautiful Victorian silver shilling, dark with a lovely, even tone from over a century of ageing. If you applied a silver polish, you'd strip that history away, leaving a garishly bright and scratched surface. While it might look 'cleaner' to an untrained eye, you would have just reduced its value by up to 90% or more.
Understanding these pitfalls is essential. To build a valuable collection, you have to avoid these destructive habits. For more guidance, exploring the seven rookie errors to avoid when collecting coins offers deeper insights into preserving the value and integrity of your collection from the very beginning.
What About Cleaning Modern Pocket Change?
So far, we've talked about handling potentially valuable coins with kid gloves. But what about the handful of change rattling around in your pocket, or that big jar of modern cupro-nickel coins you’ve been stashing away?
For these everyday, non-numismatic coins, the strict rules of conservation can be dialled back quite a bit. The goal isn't preserving a delicate, historical patina; it’s usually just about getting them shiny again for a craft project or just for the satisfaction of it.
This is a really important distinction to make. The methods we're about to discuss are absolutely not suitable for any coin that might have collector value. Using these techniques on a rare or old coin would completely destroy its worth. For modern currency destined for sorting machines or just your personal collection of pocket-pieces, a more hands-on approach is fine.
Think of it this way: a bank couldn't care less about the patina on a 50p coin before it goes into a high-speed counting machine. In these scenarios, cleanliness simply trumps preservation.
Practical Ways to Clean Modern Coins
When you're dealing with modern circulated coins, you’ve got a few more options up your sleeve. One surprisingly effective method, popular among UK enthusiasts, involves a bit of elbow grease – or rather, mechanical action.
In commercial settings, clad coins are often put through some pretty rigorous cleaning processes. You can get a similar effect at home with an electric rock tumbler, a tool borrowed from geology that's perfect for the job.
If you have a batch of grimy pocket change, you can fill a tumbler barrel with the coins, add some aquarium gravel to act as a gentle abrasive, and a bit of baking soda. Many collectors report this method quickly brings back a nice shine without causing too much wear, as long as you keep a close eye on it. You can find some great real-world examples from fellow hobbyists who have documented their experiments with practical cleaning approaches on their blogs.
Remember, tumbling is an aggressive technique. It works by literally rubbing away the top layer of the coin's surface. While it’s fine for tough modern metals, it would be a complete disaster for a soft, silver hammered coin or an ancient bronze Roman piece.
A quick but vital tip: always separate your coins by metal type before you try cleaning them as a batch. Chucking different metals together, especially in any kind of solution, can trigger a galvanic reaction. This causes spotting and ugly discolouration that's almost impossible to get rid of.
Using Chemical Solutions with Caution
Another route is a simple chemical dip. This is usually much faster than tumbling but demands perfect timing to stop you from accidentally causing permanent damage. A very common DIY solution is a simple mix of white vinegar and a little salt.
The acetic acid in the vinegar reacts with the surface tarnish, breaking it down and revealing the brighter metal underneath. The catch? The acid doesn't just stop when the tarnish is gone; it'll keep on eating away at the coin's actual metal if you leave it for too long.
Here’s how to do it safely:
- Mix Your Solution: Get a glass or plastic bowl and mix a small amount of white vinegar with a pinch of salt.
- The Quick Dip: Using plastic tongs, dip a single coin into the solution for no more than 15-30 seconds at a time. Never longer.
- Rinse Immediately: Pull the coin out and rinse it straight away under a running tap. This is crucial for neutralising the acid.
- Check Your Work: Have a look at the coin. If it still needs a bit more cleaning, you can repeat the process with another very brief dip.
This method requires your complete and undivided attention. If you walk away and leave a coin to soak, you’ll almost certainly come back to find a pitted, ruined piece with a horribly unnatural-looking surface. It's a powerful tool, but one you have to use with real precision, even on modern pocket change.
Frequently Asked Coin Cleaning Questions
As you get deeper into coin collecting, you’ll find the world of coin care is full of conflicting advice. Old wives' tales often clash with modern, conservation-focused standards, and it's tough to know who to trust. Getting clear, reliable answers is absolutely vital for protecting your collection’s value and history.
Let's tackle some of the most common questions I hear from fellow collectors, cutting through the noise to give you the clarity you need to handle your coins with confidence.
Can I Use Olive Oil to Clean My Old Coins?
This is a classic bit of "advice" you might stumble across in older collecting circles, especially for ancient bronze coins. The theory is that a long soak in olive oil gently lifts away dirt. In reality, it’s a strongly discouraged and risky method.
The problem is that oil seeps into the microscopic pores of a coin's surface and is incredibly difficult to remove completely. Over time, that leftover residue can turn rancid and acidic. This causes long-term chemical damage that is far more destructive than the original grime. A soak in distilled water is a much safer, chemically neutral alternative that leaves no harmful residue behind.
For this reason, we advise against using olive oil in favour of safer, more predictable methods. Its potential for future damage far outweighs any perceived short-term benefits.
Is It Ever Safe to Use Chemicals Like Vinegar?
For any coin with historical or collector value, the answer is a firm and absolute no. Never.
Household products like vinegar (which is an acid) or baking soda (a mild abrasive) will permanently and irreversibly damage a coin’s surface. They strip away the patina—the protective layer that forms over decades or centuries—and can cause microscopic scratches, pitting, or severe discolouration. This will utterly destroy its numismatic value.
The only time this is even remotely acceptable is for modern, common-date circulated coins with zero collector value. For example, if you're cleaning up some loose change for a craft project. In that very specific scenario, a quick dip in a vinegar and salt solution might remove tarnish, but this should never be tried on silver, copper, or bronze coins of any significance.
How Should I Dry a Coin After Cleaning It?
This is a critical step, and one where so much damage accidentally happens. You must never, ever rub a coin dry. Wiping it, even with what feels like the softest cloth, will create tiny 'hairline' scratches across the fields and devices of the coin. These scratches are immediately obvious under magnification and will slash the coin's grade and market value.
So, what should you do?
- The safest method is to gently pat the coin dry between two clean, soft, lint-free microfibre cloths.
- An even better, more foolproof approach is to simply place the coin on a soft cloth and allow it to air-dry completely.
This hands-off technique ensures no friction is applied to the delicate surface, preserving its integrity perfectly.
At Cavalier Coins Ltd, we believe that knowledge is the most important tool for any collector. For expert advice and to explore our curated selection of rare and historic coins, visit us at https://www.cavaliercoins.com.