
Building Your Coin Photography Arsenal Without Breaking the Bank
When you first dip your toes into coin photography, it’s easy to feel overwhelmed. You see those incredibly detailed shots online and assume a small fortune was spent on gear. The reality is quite different. Smart equipment choices will always beat a massive budget. Many experienced UK dealers and collectors started with surprisingly simple setups, proving it’s not about the most expensive kit, but the right kit for the job of capturing tiny, reflective metal discs.
Choosing Your Camera Wisely
Your camera is where it all begins. While your smartphone is perfectly fine for making a quick inventory, a dedicated camera gives you the control and image quality needed for serious documentation or sales. The biggest advantage is the sensor's resolution, which determines how much fine detail you can capture from a coin's surface. It's the difference between standard and high-definition TV; more pixels simply give you a sharper, clearer image.
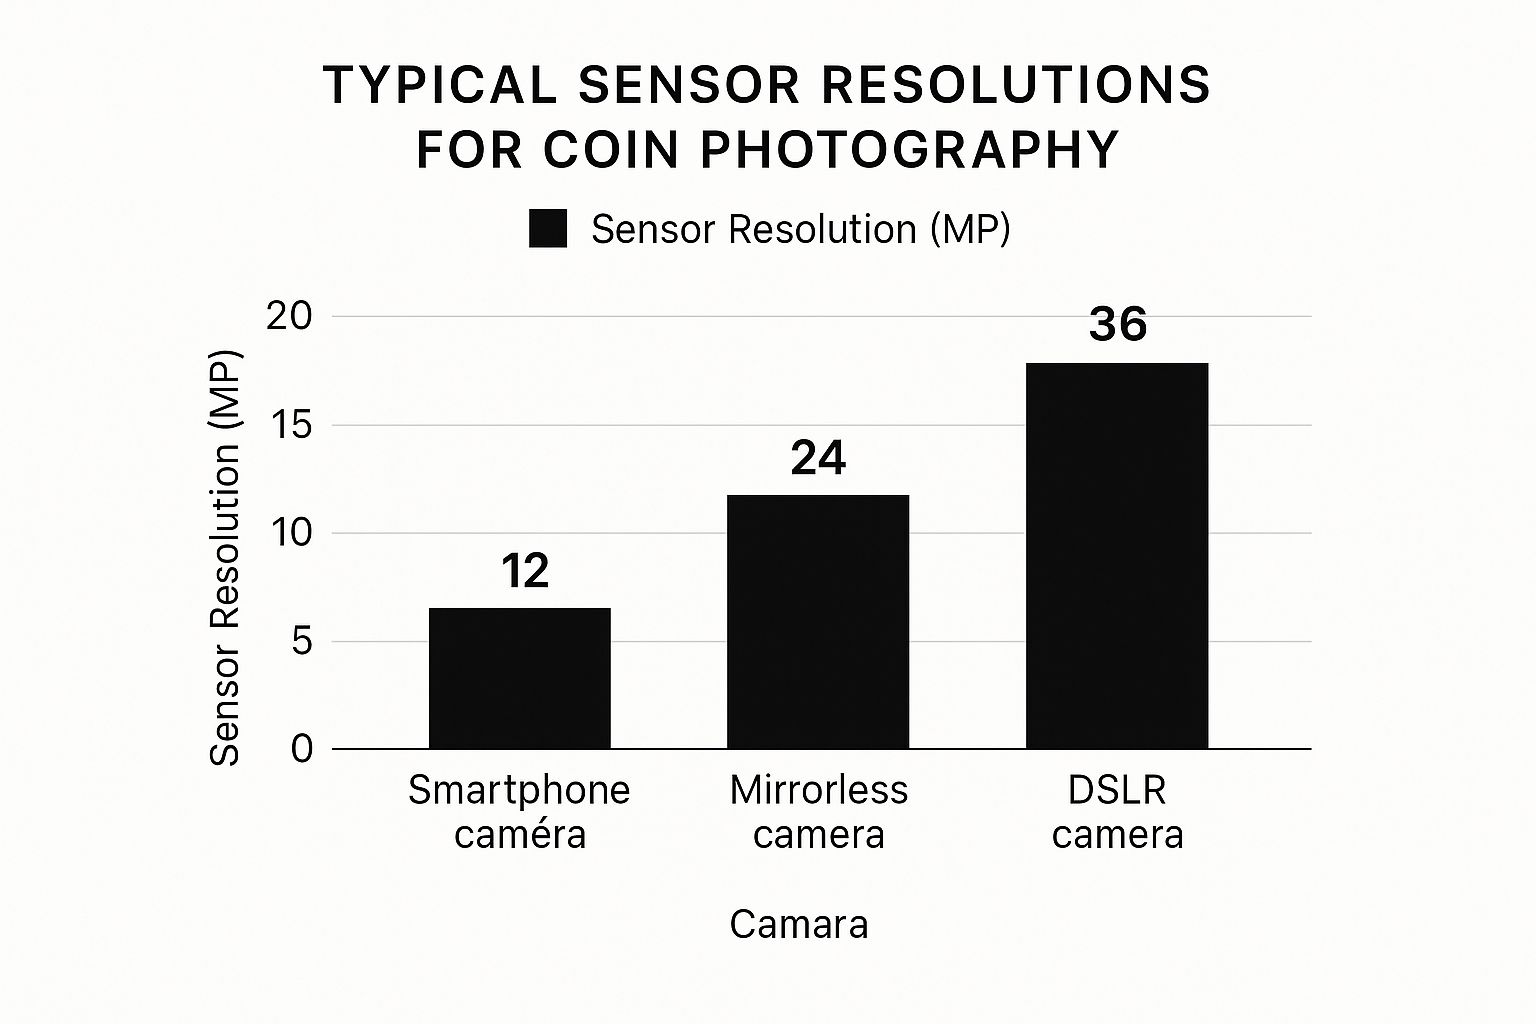
As you can see, jumping from a smartphone to a mirrorless or DSLR camera provides a massive leap in resolution. This is absolutely essential for enlarging images to inspect a tiny mint mark or a subtle die crack without the picture turning into a blurry mess.
To help you weigh your options, here's a breakdown of the typical equipment you'll encounter, from budget-friendly starting points to professional-grade tools.
Essential Equipment Comparison for Coin Photography
| Equipment Type | Budget Option | Professional Option | Best Use Case | Price Range |
|---|---|---|---|---|
| Camera | High-end Smartphone, Point-and-Shoot | DSLR or Mirrorless Camera | For quick cataloguing vs. high-detail images for auction or grading. | £0 - £300+ |
| Lens | Kit lens with extension tubes | Dedicated 1:1 Macro Lens | Filling the frame with the coin for maximum detail. | £25 - £400+ |
| Tripod | Basic, lightweight tripod | Heavy-duty, stable tripod | Eliminating all camera shake for perfectly sharp photos. | £20 - £150+ |
| Lighting | Two desk lamps with paper diffusers | LED panels, ring flash, or copy stand with built-in lights | Creating soft, even light that reveals detail without harsh glare. | £30 - £250+ |
| Shutter | In-camera 2-second timer | Remote shutter release or tethered shooting | Preventing vibrations from pressing the shutter button. | £0 - £20 |
This table shows that you can get started with a modest investment. The key is to understand where to upgrade first. You'll get more impact from a better lens or a sturdy tripod than you will from jumping to the most expensive camera body right away.
The Lens Is Your Most Important Investment
If you have to be selective with your spending, put your money into the glass. A dedicated macro lens is the single most valuable piece of gear for serious coin photography. These lenses are built for 1:1 magnification, which means they can project an image of the coin onto the camera's sensor at its actual size, capturing every last intricate detail.
For the UK numismatic market, a good macro lens is what separates an amateur snapshot from a professional image that truly shows off a coin’s texture and lustre. But even the best lens needs good light. This is a huge challenge, especially for proof coins with their mirror-like fields. A common and effective technique involves using diffused lighting to soften shadows and highlight the coin's design without causing distracting glare. UK photographers often share their solutions for this exact problem on photography forums.
The Unsung Heroes of Sharpness
Now, let's talk about the supporting gear that truly elevates your photos. First up is a sturdy tripod. This is completely non-negotiable. No matter how steady you think your hands are, they introduce tiny movements that will soften your final image. A solid tripod eliminates 100% of that camera shake, guaranteeing that every detail is as sharp as possible.
Second, always use a remote shutter release or your camera's built-in two-second timer. The simple act of pressing the shutter button, even on a tripod-mounted camera, can cause enough vibration to ruin a shot. These two inexpensive items will do more for your image sharpness than a camera upgrade costing hundreds of pounds. Of course, before you start shooting, you need to make sure the coin is ready for its close-up. You might find our guide on preparing coins helpful.
Conquering the Lighting Challenge That Stumps Most Photographers
This is where you truly start to master the craft of coin photography. You can have the best gear available, but if your lighting is off, your photos will fall flat, especially with shiny, reflective coins. The most common mistake I see people make is reaching for a ring light. While they’re fantastic for portraits, they create a perfect circular glare on a coin, washing out the fine details and completely flattening its texture. The secret isn't more light; it's better, more controlled light.
Embracing the Power of Diffused Light
Your goal is to create soft, even illumination that gently wraps around the coin. This defines its features without producing harsh, distracting reflections. We call this diffused light. Imagine the difference between harsh, direct sunlight and the soft glow on an overcast day—that's what you're aiming for. You don't need a fancy studio to get it, either. The best source is often a large, north-facing window, which provides beautifully soft, directional light.
If you place your coin near the window, you can use a simple piece of white A4 paper or card on the opposite side to bounce light back into the shadows. This simple two-point lighting setup costs nothing but can produce incredibly professional results.
Strategic Angles for Revealing Detail
When natural light isn't a reliable option, you can create a fantastic setup with two adjustable desk lamps. The trick is to avoid pointing them directly at the coin. Instead, you can make your own diffusers by taping a sheet of tracing paper or a piece of thin white fabric a few inches away from each bulb. The placement of these lights is what really brings out a coin's texture. A great starting point is to position them at roughly the 10 o’clock and 2 o’clock positions in relation to your coin.
- Try angling them low, at about a 45-degree angle. This creates small, gentle shadows that define the relief—the raised parts of the coin's design.
- Don't be afraid to experiment. Shifting one light slightly higher or lower can completely change which details stand out, from the date to the fine lines in a portrait.
This kind of precision is more than just an artistic choice; it's a technical necessity for serious numismatists. For collectors in the UK, high-quality coin photography is essential for personal records and professional grading. International grading services depend on meticulous photos to identify tiny details like hairlines, bag marks, or subtle toning, which are only visible with carefully controlled, multiple light sources. Discover more insights into professional techniques here. When you learn to master light, you've learned to master coin photography.
Camera Mastery: Settings That Deliver Consistently Sharp Results
 Once your lighting is dialed in, your camera settings are the final piece of the puzzle. This is where you move from taking a decent snapshot to creating a professional coin photograph. It's time to take full control, ditching automatic modes to get images that are perfectly sharp and consistently exposed every time you press the shutter. We're going fully manual to capture every last detail.
Nailing Your Aperture and Focus
Your first priority is the aperture, which controls how much of the coin is in focus (the depth of field). You want the entire face, from the outer rim to the central design, to be tack-sharp. A fantastic starting point is an aperture between f/8 and f/11. For most macro lenses, this range is the "sweet spot" that provides incredible sharpness without the softness that can creep in at higher f-stops like f/22.
Of course, a deep field of focus is only useful if your focus is perfect to begin with. Modern autofocus systems are amazing, but they can struggle with the subtle, low-contrast details on a coin's surface. That’s why experienced coin photographers almost always use manual focus. The best way to do this is with your camera's live view screen, which is far more precise than looking through the viewfinder.
- First, switch your lens over to manual focus (MF).
- Use your camera’s screen to digitally zoom in on a critical detail, like the date or a tiny mint mark.
- Gently turn the focus ring on your lens until that detail is perfectly crisp. This simple check ensures the most important part of your coin is flawlessly sharp.
Achieving Perfect Exposure and Color
If you're shooting a series of coins for a catalog or collection, consistency is key. To get that uniformity, you have to shoot in full Manual (M) mode. This locks in your settings and stops the camera from making its own exposure decisions between shots, ensuring every photo looks the same.
In manual mode, two settings are absolutely critical. First, always set your ISO to its lowest possible native setting, which is usually ISO 100. Your camera is stable on a tripod, so there's no need for high light sensitivity. A low ISO gives you the cleanest, most detailed image, free from any distracting digital grain. Your shutter speed can then be adjusted (often to a second or more) to get the right exposure.
Second, for accurate, true-to-life color, you must set a custom white balance. The auto white balance setting is often confused by a coin's metallic shine or toning, which can add an unnatural blue or yellow tint. The fix is simple: take a quick photo of a neutral grey card under your lights. This tells your camera exactly what "white" looks like in your setup, making sure your old copper coin actually looks like copper, not orange. This step is a game-changer for anyone serious about accurate coin photography.
Composition Secrets That Make Your Coins Look Museum-Worthy
Now that you have your lighting and camera settings dialed in, we can move on to the artistic side of things—composition. A technically solid photo is your starting point, but a well-composed shot is what truly brings a coin’s history and character to life. This is how you tell its story and draw attention to the details that fellow collectors and potential buyers care about most.
Staging Your Coin With a Purpose
Before you even place the coin, ask yourself a simple question: why am I taking this picture? The answer will guide every decision you make about the composition. If you're photographing a coin for an online sale on a platform like eBay, your goal is to build clarity and trust. This calls for a simple, distraction-free background—think a clean white, grey, or black surface. You want a potential buyer’s focus to be 100% on the coin itself, with no other visual clutter.
If you’re building a long-term photographic record of your collection for documentation or insurance, then consistency is the name of the game. This means using the exact same background, lighting, and camera angle for every single coin. Photographing both the obverse (heads) and reverse (tails) in an identical style creates a professional, organized catalog that looks great and preserves its informational value.
Handling and Documenting With Professionalism
The way you handle a coin during a photoshoot speaks volumes. Always use soft cotton gloves or hold the coin carefully by its edges. A single fingerprint can leave oils that permanently damage a coin's delicate surface, which can seriously reduce its value and visual appeal. This isn’t just for looks; it’s a critical part of preservation.
For serious collectors, a good photograph can become a piece of historical evidence. In the UK, organizations like the British Numismatic Society (BNS) use high-magnification photography almost like a forensic tool to study the dies used to mint historic coins. This level of detail can reveal unique identifiers, like tiny 'rosettes' on certain pieces, and helps differentiate coins made in English mints like Lincoln from those made in Winchester. This kind of photographic analysis is essential for advancing our understanding of British coinage. You can explore the BNS's detailed documentation methods here.
Your aim should be to develop a simple, repeatable system for your own work.
- Always photograph the obverse and reverse to create a complete record.
- Choose one background and stick with it for a consistent collection catalog.
- When shooting for insurance purposes, include a ruler or a common object in at least one shot to provide a clear sense of scale.
This thoughtful and consistent approach to photographing coins will help you build immense trust and show your deep respect for numismatics.
Smart Editing That Enhances Without Deceiving
Once you've captured a great shot in-camera, the final polish happens in post-processing, often called the "digital darkroom." This is a key part of learning how to photograph coins, but it’s a stage that comes with serious responsibility. The aim is to faithfully represent the coin, not to create a misleading fantasy.
The Ethical Line in the Digital Darkroom
In the world of coin collecting, trust is everything. Editing a photo to remove scratches, hide spots of wear, or artificially pump up a coin's luster is a deceptive practice. It's a major breach of etiquette that can quickly ruin your reputation among fellow collectors and potential buyers.
Your goal should be to produce a completely honest portrait of the coin, flaws and all. Think of it less like photo manipulation and more like developing a film negative. You are simply bringing out the fine details that your camera sensor captured but might not be perfectly rendered in the raw image file. This approach ensures everyone sees the coin for exactly what it is.
Essential Adjustments for Coin Photography
With our ethical principles as a guide, a few small adjustments can make a huge impact. Think of your editing software as the control panel for fine-tuning the final image.
-
White Balance Correction: Even if you set a custom white balance on your camera, you might notice a slight color cast in your photos. A quick correction ensures a silver coin looks like silver, not faintly blue or yellow. This is the number one fix for achieving accurate, true-to-life color.
-
Exposure and Contrast: A gentle tweak to the exposure can brighten the overall image, while adjusting the contrast helps the coin’s design elements pop. Use the histogram tool in your software to make sure you aren’t "clipping" your highlights into pure white or crushing your shadows into pure black, as this will erase valuable detail.
-
Selective Sharpening: This should always be your final step, and it requires a delicate touch. It's very easy to over-sharpen, which creates ugly digital noise and unnatural-looking halos around the coin's edges. Just apply enough to make the fine details look crisp.
For these basic tasks, free software like GIMP works wonderfully. If you’re a serious enthusiast looking for more precise control or features like batch processing for many photos at once, tools like Adobe Lightroom or Photoshop are the standard. Always remember, the best editing is the editing you don't even notice.
Solving the Problems That Drive Coin Photographers Crazy
If you’ve spent any time with a camera and a coin collection, you know the feeling. You're trying to capture a beautiful proof coin, but all you get is a stubborn glare. Or maybe that beautifully toned silver piece looks dull and flat on your computer screen. These moments can be incredibly frustrating, but there's almost always a practical fix. The trick is to correctly diagnose the issue so you can apply the right solution.
Taming Difficult Coin Surfaces
Not every coin cooperates under the lights. Some types are notorious for causing headaches, but a simple change in your lighting strategy can make all the difference.
-
High-Relief Proof Coins: That combination of a mirror-like background and a frosty, raised design is a recipe for reflections. The best approach here is often axial lighting. This technique involves placing a piece of glass at a 45-degree angle between the lens and the coin. You then shine a light onto the glass, which reflects it directly down onto the coin. The result is perfectly even, glare-free light that makes the design stand out.
-
Heavily Toned Silver: The secret to capturing the vibrant rainbow of colors on a toned coin is avoiding harsh, direct light, which will wash everything out. Instead, use two diffused light sources and play around with their positioning. Moving a light just a couple of inches can completely change which colors the camera picks up, revealing the coin's true beauty. A custom white balance setting is also essential for getting the colors just right.
-
Worn Copper Coins: Old, dark copper coins can sometimes feel like they just soak up all the light you throw at them. To bring out the faint details on these dark surfaces, try using a single, powerful light source placed at a very low angle. This is known as raking light, and it works by creating long, soft shadows that catch the edges of worn-down designs, making them visible again.
To make troubleshooting easier, I've put together a quick reference guide. It covers some of the most common frustrations coin photographers face and how to fix them on the spot.
Common Coin Photography Problems and Solutions
Quick reference guide for troubleshooting frequent issues with their causes and step-by-step solutions
| Problem | Likely Cause | Quick Solution | Prevention Tip |
|---|---|---|---|
| Harsh Glare on Proof Coins | Direct overhead light is creating "hot spots" on the mirror-like surface. | Use an axial lighting setup with a 45-degree glass plate to reflect light evenly downwards. | If you shoot proof coins often, build a permanent axial lighting box for consistent results. |
| Toned Colors Look Flat | A single, harsh light source is washing out the delicate, iridescent colors. | Use at least two diffused light sources and experiment with their angles to see how the colors change. | Always start with diffused, multi-point lighting for toned coins and adjust from there. |
| Details Lost on Dark Coins | Soft, diffused light is being absorbed by the dark surface, hiding worn details. | Use a single, strong light source at a very low angle (raking light) to create shadows that define the design. | Invest in at least one small, powerful LED panel that is easy to position at extreme angles. |
| Reflections from Plastic Holder | Light is bouncing off the surface of the "slab" and into the lens. | Use small pieces of black card to block stray light from hitting the holder. | A polarizing filter for your lens is the best long-term solution for eliminating slab glare. |
As you can see, most issues come down to how you control your light. Mastering these simple adjustments will solve the majority of your problems.
Conquering Technical and Practical Hurdles
Sometimes the problem isn't the coin itself, but your gear or environment. For example, shooting coins inside their protective holders, often called slabs, is a common challenge because the plastic case adds another reflective surface. The key is to light the coin, not the slab. I use small pieces of black card to block any stray light from hitting the holder directly. A polarizing filter on your lens is also a fantastic tool for cutting down reflections.
Many other technical issues, like blurry photos from camera shake or off-kilter colors, are often caused by small oversights. These are common traps for new collectors, and you can learn more about other rookie errors to avoid in our dedicated article. For instance, if you find yourself shooting in a tight space, don't wrestle with big, clumsy softboxes. A good copy stand paired with small, adjustable LED panels will give you far more control and take up much less room.
Creating Your Personal Coin Photography System
Taking a few photos of a prized coin is one of the joys of the hobby. But when you need to photograph an entire collection, that joy can quickly turn into a tedious chore. The secret that seasoned collectors and dealers use isn’t about having more time or patience; it’s about having a well-designed system that makes the process smooth, consistent, and even satisfying.
Design Your Workspace for Speed
The first step is to create a dedicated photo station, even if it's just a temporary corner of a desk. Having your copy stand, lights, and backgrounds ready to go removes the hassle of setting everything up from scratch each time. Keep your cotton gloves, a neutral grey card, and a few different colored backgrounds within arm's reach.
This small bit of preparation is often the difference between getting the job done and putting it off for another day. The goal is to be able to go from deciding to shoot to taking your first picture in under five minutes. Turning this into a habit transforms photography from a major project into a simple, repeatable routine.
A Foolproof Digital Workflow
Once the photos are on your computer, having a logical system is non-negotiable. Without one, you’ll quickly find yourself lost in a sea of generically named files. The key is to develop a consistent naming convention that makes sense to you. A great format to follow is CoinName_Date_Side_001.jpg. For instance: Victoria_BunHead_Penny_1862_Obverse_001.jpg.
Pairing this naming structure with a clear folder system (like a main folder for "UK Pennies" with subfolders for each monarch) creates a fully searchable digital archive. This kind of detailed record-keeping is a fundamental part of smart numismatics. You can find more great advice in our guide on the top 5 tips when collecting coins. This discipline pays off massively, whether you're preparing for an insurance valuation or a future sale.
The real magic of a good system comes from batch processing. Instead of editing every single photo one by one, you can apply consistent adjustments to dozens of images at once using software like Adobe Lightroom. You can create editing presets for specific coin types—like "Toned Silver" or "Bright Copper"—to give your collection a uniform, professional look with just a single click. This maintains high quality while saving you countless hours.
Building a smart system turns the task of documentation into a rewarding part of the hobby, helping you better manage and appreciate your collection. For your next great find, explore the exceptional range of coins at Cavalier Coins.